Tuesday, December 20, 2011

Thanks a latte!

Looking for a super cute and easy gift to say "thank you" this Christmas season!?  I found this on eighteen25 and couldn't resist making it for my kids' teachers.  All I had to do was print it off, add a "java jacket" (I made mine out of brown cardstock), tie some jute around it, and add a GC to a local coffee shop.  We also gave each teacher a coffee mug to go with it. 


What do you give your teacher for Christmas?

Monday, November 28, 2011

Pinterest

Like many of you, I've become slightly addicted to Pinterest!  It has so many GREAT ideas...ALL IN ONE PLACE!  Need turkey treats for school.  Check.  Christmas ornaments for kids to make at church. Check.  Inspirational Words.  Check.  A new dinner recipe.  Check.  It's heavenly. 

Found on pinterest.  Original source: http://www.thehighheeledhostess.com/2011/11/turkey-treats.html. I used store bought "cookie icing" to serve as the "glue" to hold everything together.  Worked really well and dried fast.  Even the kids helped.  The above picture is our final product...pretty cute!

Found on pinterest. Original source:  http://craftysisters-nc.blogspot.com/2010/12/baby-jesus-ornament.html.  We made these for Sunday School, so in order to keep the cost down decided not to add the wooden star. 

 Great question, isn't it!?  LOTS of wonderful, insightful quotes floating around on people's boards.

Found picture on pinterest.  Googled Pineapple Barbecue Bacon Burgers and found the recipe here: http://allrecipes.com/recipe/pineapple-bacon-burgers/

Happy Pinning!

Thursday, October 20, 2011

Sock Curls

My girls have stick straight hair.  They're not fond of sleeping in curlers and when they do it always seems like one or two fall out during the night, which leaves straight patches amongst a full head of curls.  Ugh.  So, when I found this video on using socks to curl your hair, I thought I would give it a try.  It's AMAZING!

I just used 3 trouser socks for our first try at it.  One on the top and 2 on the sides.  She went to bed, giggling because she had socks in her head!  :)


In the morning, I untied the socks and this is what it looked like...


Pretty cool, huh!!??  A couple nights later, we had my nieces over and decided to try our hand at it again.  This time using a little thicker socks, which made for a little bigger curl.


So fun!!!


Note:  Please ignore my streaky mirror.  Little hands were hard at work "helping" me clean!  :)

Saturday, October 15, 2011

Faux Tile

The Transformation - Part 3.  (Feel free to take a look back to Part 1 and Part 2 if you would like.)  This post is going to focus on one room...the basement bathroom.  This stonework in this bathroom is amazing...the concrete floor, not so much!


The thought of getting flooring to lay nicely on concrete that wasn't level and then cutting in to match the unevenness of the stone seemed like a nightmare.  SO, we decided to grab some paint instead!


We used Latex Garage Floor Paint and turned the concrete floor into this...


Now, keep in mind that we did this project 5 years ago before we had entered the blogging world.  Do you know what that means!??  We didn't take ANY pictures of the process. Not one. 

HOWEVER, after 5 years of use, we began to notice it looking a little worn.  This might be fine in some areas, but in the bathroom it just appeared "dirty"...NOT the look we were going for.  I was actually really excited that we needed to repaint because it meant I could share the process with all of you!!!  ;)
STEP 1:  Figure out your pattern.  We wanted the 12 x 12 tile look.  Tape off anywhere that you DO NOT want to paint.  It's amazing how much the bare concrete below looks like grout when it's all done.  We used painters tape, which we cut with an exacto knife to make it thinner.  Someone later recommended using mechanical or electrical tape, as it comes in thinner widths. Wondering how it would pull up though?


STEP  2:  Begin painting with a roller...EASY.  When we originally painted the floor, we used a roller with a long handle for the main part of the floor and the shorter handle one to trim.  This time we didn't have the long handle...much harder on your back.  If you have a large space, we HIGHLY recommend the long handle!!


STEP 3:  Let dry and pull up the tape. This is my favorite part!


There you have it!  Plain, gray concreted turned into tile with nothing but a little paint!

Saturday, September 3, 2011

BARN SALE!

I am so excited about the Hesston Barn Sale this year!! I didn't make it last year, but heard it was tons of fun and there were some great finds! Mark your calendar and head on out!


Please print the flyer, pass it out to friends and strangers, blog about it, tell your facebook friends, invite your neighbors and help spread the word about the Fall 2011 Barn Sale. Help to make this the biggest and best Barn Sale yet!

Monday, August 22, 2011

Cupcakes

I have a daughter that doesn't like cake, which means she doesn't like cupcakes either.  My friend, Summer, made some super adorable cupcake toppers to match the "WIPEOUT" Theme my little7 year old wanted for her party.  Do you see my dilemma!?

Enter blogland.  I love this place.  I found this cake and decided if they could make a cake (which is SUPER cute) out of rice krispies, I could make cupcakes!!
 
  Source: eighteen25


Pretty cute, huh!!??


Cupcake Toppers made by Sugar Britches Designs.

Thursday, July 28, 2011

Scrapbook Garage Sale


I was asked to pass this along...  

ANNUAL SCRAPBOOK GARAGE SALE
September 10th
9-1
Mt. Vernon Presbyterian Church
3700 E. Mt. Vernon
Wichita, KS

It’s that time of year once again.  Come and sell your new/used supplies.  Come and shop ‘til you drop!  Email me at Jhuelsman@keymgmt.com or call me at 619-6226 after 5:00pm for information on the sale.  C’mon girls make some extra spending money and sell your unwanted or leftover supplies.  Tell everyone you know that is a scrapbooker or cardmaker that this is the sale you can’t miss.

Table rental is $10 (same as last year).  Invite everyone you know to come shop or get a table with someone if you don’t have enough.  One table is included in the price of $10, and it is either a Round or Long table.  Get your reservations in early as they will sell out once again.

Thursday, July 14, 2011

Homemade Dog Biscuits

The kids and I have been enjoying our Summer Fun List again this year. (You can see our 2009 list here.)  Recently, we crossed off "make a gift" by making Homemade Dog Biscuits and delivering them to the neighborhood dogs.  Rumor has it they were a hit! 


Basic Dog Biscuit Recipe

 Ingredients:
3 1/2 cups unbleached flour
2 cups whole wheat flour
1 cup cornmeal
1/2 cup skim milk powder
1 Tablespoon (or 1 pkg) dry yeast
3 1/2 cups lukewarm chicken or meat broth


Dissolve the yeast in the lukewarm chicken or meat broth. The richer this broth is, the better your dog will like the biscuits.  Let yeast broth mixture set 10 minutes.  Then stir in flour mixture (which is everything else).  Roll resulting dough out 1/4" thick.  Cut dog biscuit shapes from dough.  Brush biscuits with egg wash.  Bake on greased cookie sheets at 300 degrees for 45 minutes.  Then turn off oven and leave in overnight to finish hardening (we made our in the morning and then let them set all day).  Makes 60 medium-sized biscuits.

Monday, July 11, 2011

Baby Shower/Adoption Celebration

Back in March, I shared this story with you...one about a baby discovered on Facebook that instantly filled the hearts of so many.  Adoption is beautiful and we finally got to celebrate as it became "official"!!!  We threw a Baby Shower/Adoption Celebration for my friend and I wanted to share some of the decorations with you.


We held it at a church, so we knew we had a lot of browns to work with.  We went with a blue/brown/red/white color scheme (which was pretty easy to find around the 4th of July!).


I made onsies with his name spelled out (the fabric used for the letters became the common thread that pulled the color scheme all together).  We used twine as the "clothesline" and added baby socks for extra cuteness!


Made much lovelier by the generosity of friends and family!


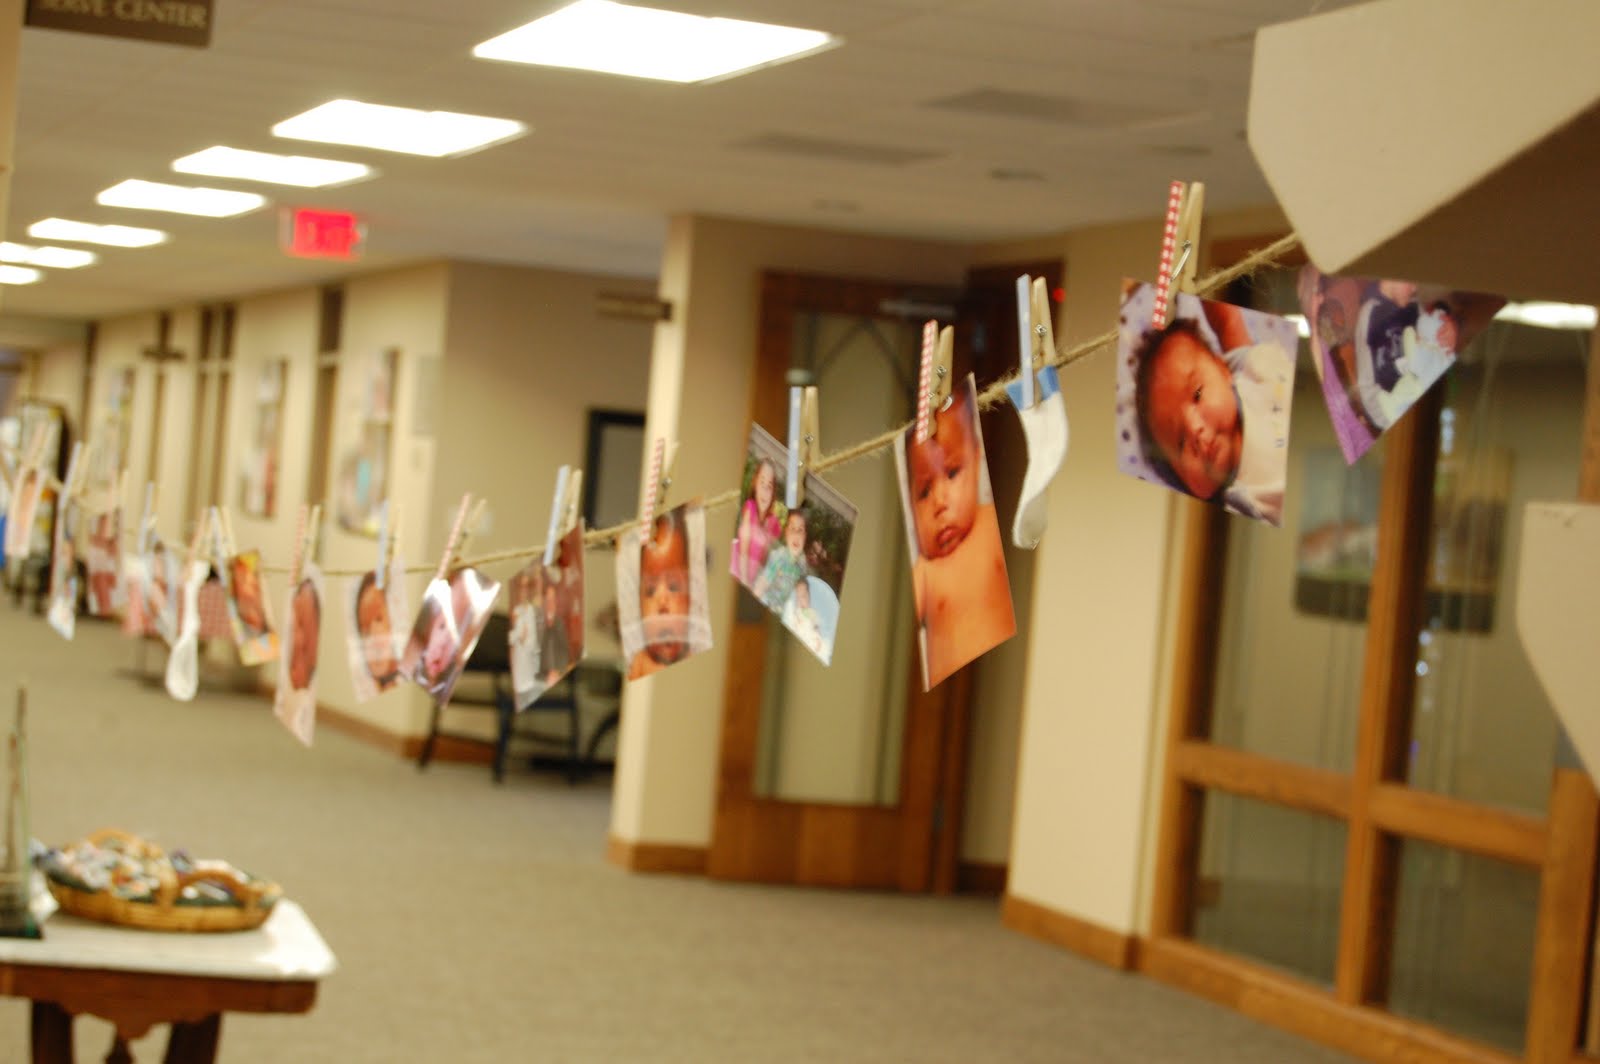
We used more twine and decorated clothespins to hang pictures all over the room.  Again, with a few socks stuck in here and there.


The decorative clothespins are SUPER easy and just adds that "little extra" punch.  You can find the tutorial here.  I didn't make mine magnets like she did, but that's a cute idea too!


On the tables we used a white round tablecloth and then cut a large square of fabric (the same as the letters on the onsies) to place on top.  A white vase filled with 3 pinwheels and tied with a ribbon made for fun centerpieces.  I found the pinwheels here.


We had a "Blessings" station set up for each of the couples 3 kids.  Guests were to write a special note for their upcoming birthdays and adoption days (they were all adopted).  There was an envelope for 1st bday, 1st adoption day, 2nd birthday, 2nd adoption day, etc.


We put a note next to the blue bins that said, "Please choose a blank envelope and a blank card and share a special memory, a piece of advice, or simple well wishes to provide a blessing in the future."  One bin had the envelopes that we had already labeled, the next blank cards, and the third was for the completed cards in envelopes.  The parents will then be given all of these cards to give each of their kids on the corresponding bday/adoption day in the future.


Food, lots and lots of food...


The beautiful momma and of course the guest of honor!  Every time I turned around, he was in the arms of someone else...just as it should be!


I finally got my hands on him!!!  A beautiful day.  God is good.

Thursday, June 30, 2011

Kid-Friendly Snack

Apples with peanut butter and sprinkles.  This is a quick, fun snack!  You could use red, white, and blue sprinkles and it would be a fun treat for the 4th of July!

Wednesday, June 29, 2011

Rolled Meatloaf

I wasn't a big meatloaf fan, until I tried this recipe. It's delicious! Five out of five people devoured it at my house. That's a keeper, folks!

Ingredients:
2 lbs. lean ground beef
2 eggs
3/4 c. oatmeal
1/2 c. tomato juice
2 Tbsp. parsley flakes
1/2 tsp. oregano
1/2 tsp. salt
1/4 tsp. pepper
1/4 tsp. garlic powder
8 thin slices ham
6 oz. grated mozzarella cheese
1 c. spaghetti sauce


Beat eggs, add tomato juice, oatmeal, and spices.  Stir.


Mix well into meat.


Pat mixture into 10x12" rectangle on waxed paper.


Arrange ham on top, then sprinkle cheese over.


Roll at short end, lifting paper.


Pinch seam together (the original recipe doesn't say to do this, but it just seems like you should).


Place roll, seam side down in pan.


Bake at 350 degrees for 1 hour and 15 minutes.  Drain off liquids.  Pour spaghetti sauce over meat.  Bake 10-15 minutes more.  Slice and serve. 

It was gone before I could get an "after" picture!  Let me know if you try it!