Wednesday, May 13, 2009

Tina Spain from Lord of Life Lutheran Church in Wichita, KS asked if I would post the following information for our blog readers. They are searching for crafters for their Annual Craft Fair, so if you've been thinking about selling your "goods" give Tina a call and she will get you all set! If you don't have anything to sell, mark your calendar for Oct 3rd (this date has changed from the original Oct 17th date) in order to do a little shopping!

Craft Fair Exhibitors Needed
Lord of Life Lutheran Church is hosting our
Craft Fair & Fall Festival
October 3rd (9am-2pm)
( 11215 W 13th St N)

Indoor Booth Space is limited
(Booth dimensions vary, 8x8, 6x10, 8x10, 8x7 center, 14x2 ½ : $25 each)
(One 6ft x 2 ½ ft table and 2 chairs provided, you may add your own tables as space allows)

Outdoor Booth space is unlimited
(Outdoor booth 10’x10’ for $25 or 10’x20’ for $30 or 10’x30’ for $40)
(You provide your own table/chairs/tent as needed)
(Returning vendor cost = $15/booth indoors or outdoors)

All Hand-Made Crafts are welcome:
Quilting, Woodworking, Metal/Iron Working,
Stone work/sculptures, Pottery, Painting, Embroidery,
Sewing, Knitting, Crocheting, Scrap-booking, etc.

Also welcome Personal/Unique Services:
Wedding planner, Personal Organizer, Cake Decorator,
Floral design (fresh/silk), etc.
(Individuals/groups trying to start a new service/business)

The church will also be hosting its Fall Festival during the fair. This will provide games and fall crafts (pumpkin painting & scarecrow stuffing) for the kids as well as a concession stand with an
Oktoberfest style menu. Possible live music too!

Anyone wanting to display and sell their crafts
or services should call today.
Please contact Tina Spain for more information.
Reserve your booth today!
tmsveldt@swbell.net
316-204-3448

Wednesday, May 6, 2009

Fun Dinner Idea

I was trying to decide what to make for dinner one night and opened the fridge to see what I could come up with. I was in a hurry...was thinking leftovers, but there wasn't enough to go around. I seemed to have a little of this and a little of that and I had THREE kids to feed! So, here's what I did for each of them...


All you need are some cupcake papers and a little bit of this and a little bit of that! FUN!!!!

Tuesday, May 5, 2009

First Friday Feature

...posted on a Tuesday!! I have had the idea of doing a local "Friday Feature" for awhile now, but Fridays seem to come and go without me posting. We have so many wonderful ladies that enjoy "crafting" at Maple Memories, but they also like to get out and see what there is around town. I thought I would use the blog as a place to showcase some of the places, people, and activities that we love here in McPherson. So, here it goes. Our first "Friday Feature" on a TUESDAY! Keep coming back on FRIDAYS (or maybe Tuesdays or even possibly Wednesdays!??) to find out what else there is to do around town.

MILAN
106 East Elizabeth Street
McPherson, KS

When you arrive at Milan's, you are greeted by a large chalkboard with the nightly specials located next to a beautiful entryway. Milan's has a limited menu of nightly specials, variety of cheeses, antipasta, fruit & fondue, wines, beer & spirits. The night that I went with friends, I choose the shrimp platter and it was delicious!! Others in my group ordered a specialty salad or the open face steak sandwich. Both were equally impressive. The staff is friendly and efficient.

Milan's has limited hours of 5:30pm - 9pm and are open Tuesday - Friday. A wonderful article was written in the McPherson Sentinel by a patron...I would encourage you to read it for a more personal account of his experience at Milan's. There is limited seating inside, however it is attached to The Courtyard on Main restaurant (one of my favorites and soon-to-be Friday Feature!) so they will seat you in it as overflow. Below you will find a couple more pictures of the beautifully decorated interior. If you've been, feel free to leave reviews by commenting on this post.

Friday, May 1, 2009

REPURPOSING

I have been hearing a lot about "repurposing" lately and thought I'd give it a try! For those of you that DON'T know what that means, it's simply taking an object and using it for something other than its original use. I have had this wood bulletin board since I got married 11 years ago...it has been hanging on the wall, not being used. It didn't really go with our decor anymore and I didn't really have a "purpose" for it. HOWEVER, I decided it was a great piece for my first "repurposing" project. Keep reading to find out what the final outcome was!


Most "repurposing" projects seem to involve some type of paint. I started off with a little black spray paint...it need 2 coats.


I then spray painted the brass hardware (hooks) with a nice shiny silver. I found some clothes pins and spray painted them silver as well. I know the suspence is killing you, isn't it!!??


I took some E6000 adhesive to glue the clothes pins to the old corkboard/bulletin board part. Then found some fun glittery chipboard letters and stuck them on above the pins. This is my new handy dandy "lost socks" holder hanging up in my laundry room!! FUN, isn't it!!??

I think I'm addicted!! Garage Sales and Thrift Stores, here I come!!

Thursday, April 23, 2009

When life gives you scraps...

MAKE A WREATH...


Don't the bright colors in this just make you smile!? There is such randomness in the colors and patterns (yet it's so beautiful) that it is the perfect way to use up your bits and pieces. Hop on over to Linda's to find out how to create this wonderful wreath!

MAKE A BELT...


Creative Little Daisy has a wonderful tutorial on how to make this belt. Take a look around at your pile of scraps and imagine the possibilities!!


MAKE A NECKLACE...


I found this adorable necklace over at cakies...isn't it cute!? What a fantastic way to recycle your scraps. You can make one yourself thanks to her wonderful step by step instructions.


Monday, April 13, 2009

Tulip Bouquet


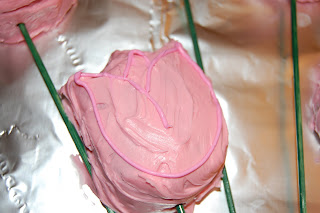
My daughter wanted to have a "Garden Party" to celebrate her 8th birthday. I found this great Tulip cupcake pan in with the Easter supplies at Wal-Mart and just had to get it. I ended up creating a "tulip bouquet" (actually 2 of them...needed to feed 14 girls!). All you need is the tulip cupcake pan (they have other types of flowers as well), cake mix, pink frosting, bamboo skewers, green spray paint, and pretty ribbon.


Step 1: Paint skewers with green spray paint. These will be the "stems".


Step 2: Bake cupcakes while paint is drying. I made 7 cupcakes per bouquet...that's what I could make fit on my cake board without it looking overly crowded.


Step 3: Frost cupcakes with pink frosting (I used Strawberry from Betty Crocker...quick and easy!).


Step 4: Pipe tulip shape (lines) on top of cupcakes to help define the type of flower. I added food coloring to darken up the pink frosting.


Step 5: Arrange on foil covered board and insert "stems". Gather in the middle with a pretty bow!

Tuesday, April 7, 2009

TURN THIS...


INTO THIS...


Julie has a wonderful tutorial on how to turn a metal gardening bucket into this beautiful creation. There are only 5 items needed to complete this project and it doesn't even require any sewing!! It looks so quick and easy, I can't wait to make some of these!